Dec 27, 2009

Using Windows Movie Maker on Windows 7

For Those Don't Like Windows Live Movie Maker

Both Windows Movie Maker 2.6 and 2.1 are available on Windows 7, you could free download movie maker and install Windows Movie Maker 2.6 (Vista) or 2.1 (XP) in Windows 7 for the familiar features and operations.

Free Download Windows Movie Maker 2.1 (XP) and install in Windows 7
Free Download Windows Movie Maker 2.6 (Vista) and install in Windows 7
Or if you want to upgrade to Windows Live Movie Maker, click the link below to download first.
Free Upgrade to Windows Live Movie Maker for Windows Vista and Seven

This article also shows you how to directly copy Windows Movie Maker files from old operating system to the latest Windows 7 system. The reason is: Windows Live Movie Maker, part of Windows Live Essentials, is an extremely easy to use movie making tool to put together photos and home video on your Windows computer. However, it does lack some features users of good old Windows Movie Maker enjoyed.

Using Vista Movie Maker on Windows 7

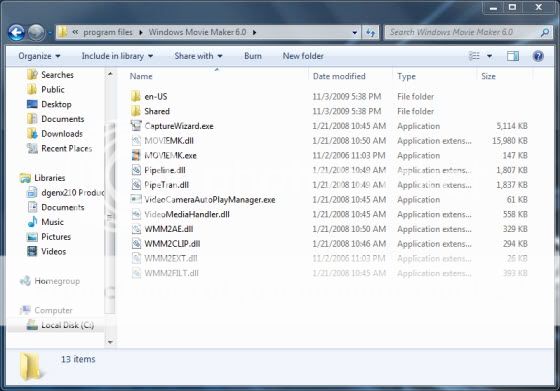
1. Locate Windows Vista Movie Maker 6.0 Files
You need to find a computer with Windows Vista Movie Maker installed, usually locates under C:\Program Files\Windows Movie Maker 6.0\ folder.

Windows 7 Movie Maker Note: If you are going to install Windows Movie Maker on a Windows 7 64-bit, make sure that the old Windows Movie Maker files you will use came from a 64-bit version of Windows Vista.

Install Windows Movie Maker 6 for Windows 7

2. Copy Windows Vista Movie Maker 6 Files
Copy the entire movie maker folder to a new folder, say the default location: C:\Program Files\Windows Movie Maker 6.0\

3. Register DLL Files to Make it Work (like WMM installation )
Download and run the following registration file below to finally install Windows Movie Maker 6.0 on Windows 7.

Free Download Now

It's the batch file from an elevated command prompt. It includes commands to register copied dlls required for running Windows Movie Maker 6.0. You could make it yourself and run as administrator. Just copy the following text and save as a *.bat or *.cmd file under C:\Program Files\Windows Movie Maker 6.0\. Finally double click and follow the on-screen instruction.
regsvr32 wmm2ae.dll
regsvr32 wmm2clip.dll
regsvr32 wmm2ext.dll
regsvr32 wmm2filt.dll
regsvr32 VideoMediaHandler.dll
regsvr32 Pipeline.dll

Register Windows Movie Maker 6 for Windows 7

4. That's it! Now You can launch old Windows Vista Movie Maker 6.0 on Windows 7 instead of Windows Live Movie Maker.

Using Windows Movie Maker 2 on Windows 7

Windows Movie Maker 2.1 is the default version of Movie Maker for XP. It supports all kinds of 3rd party and user tweaks of effects, transitions and title overlays. If you want to use these custom resources on Windows 7, you may have to transfer Windows Movie Maker to Windows 7. Here is how to move Windows Movie Maker to Windows 7. It's similar to installing Windows Vista Movie Maker in Windows 7.

1. Locate Windows Movie Maker 2 Files, it usually locates under C:\Program Files\Movie Maker\ folder.
2. Copy Windows Movie Maker 2 files to a new folder, C:\Program Files\Movie Maker\ is required if you using the provided registration script below.
3. Register DLL Files. Download and run "install-movie-maker-dlls.cmd" below. Please run as Administrator and follow the instructions.

Free Download Now

You could also paste the following text to a *.bat or *.cmd file under C:\Program Files\Movie Maker\. Finally double click and follow the on-screen instruction.
regsvr32 /s qdv.dll
regsvr32 /s quartz.dll
regsvr32 /s wmvcore.dll
regsvr32 /s wmvadve.DLL
regsvr32 /s shimgvw.dll
regsvr32 /s msxml.dll
regsvr32 /s msxml2.dll
regsvr32 /s msxml3.dll
regsvr32 /s "%ProgramFiles%\Movie Maker\wmm2fxa.dll"
regsvr32 /s "%ProgramFiles%\Movie Maker\wmm2fxb.dll"
regsvr32 /s "%ProgramFiles%\Movie Maker\wmm2ae.dll"
regsvr32 /s "%ProgramFiles%\Movie Maker\wmm2filt.dll"
regsvr32 /s "%ProgramFiles%\Movie Maker\wmmfilt.dll"
regsvr32 /s "%ProgramFiles%\Movie Maker\wmm2ext.dll"
regsvr32 /s "%ProgramFiles%\Movie Maker\wmm2clip.dll"

4. That's all! Now You can run old Windows Movie Maker 2 on Windows 7 instead of Windows Live Movie Maker.

Useful Computer Tools

  1. Slow Computer? Speedup Your PC in 3 Mins!
  2. Sonic Producer for Music Enthusiast
  3. Error Nuker - Fix All File Errors on Windows
  4. Easy DVD Copy to Backup DVD Movie to Computer

Dec 25, 2009

The Best Music Maker for Windows

Some day, I encountered Magix Music Maker, and immediately I knew she was who I am searched for such a long time.

Best Music Making Software for Windows

Magix Music Maker is the best music maker for windows so far. With a few clicks, you get your rock songs, hip-hop music, techno music and any type of music. With this best windows music maker, you can arrange, edit, build and mix tracks with intuitive, easy to use music making tools that provide for a precise, professional music editing experience. The abundant music resources let everyone be the musician!
Download Free Music Maker for Windows
Purchase Magix Music Maker 15 at Amazon for $41.49 (instead of $59.99)

Watch video tutorial for windows music maker


Download Free Music Maker for Windows
Purchase Magix Music Maker at Amazon for 31% off

Useful Computer Tools

  1. Slow Computer? Speedup Your PC in 3 Mins!
  2. Sonic Producer for Music Enthusiast
  3. Error Nuker - Fix All File Errors on Windows
  4. Easy DVD Copy to Backup DVD Movie to Computer

Dec 20, 2009

Wizard-Guided Photo Slideshow Making

Many people shoot loads of photos and video and store in the deep folder. Do you think of sharing these photos and videos that maybe carried precious memories on TV or online? All you need is a best slideshow program for windows. According to my own experience, the best photo slideshow software is Xtreme PhotoStory on CD & DVD 8 Deluxe from Magix. You can make photo slideshow with ease or customize individually, just depending on your needs. Surely, you can evaluate it for FREE before paying any money. OK, now check it out how easy to tell a photo story with slideshow wizard. A more customized slideshow tutorial will be given later.

Wizard Slideshow Step 1: Load Photos & Video to Slideshow

Magix Xtreme PhotoStory on CD & DVD 8 deluxe is very powerful yet easy-to-use slideshow program for windows 7. It provides various wizards for slideshow making, movie show making, soundtrack making and so on. To start a slideshow wizards, go to File / Wizards / Slideshow wizard, and following interface will appear. Here you can decide to make a standard slideshow (4:3 slideshow) or widescreen slideshow (16:9 slideshow), photo duration and the slideshow video format to share slideshow. It could Blu-ray disc, DVD, miniDVD, SVCD, VCD, WMV HD disc, etc. Sharing your photo slideshow is totally convenient.

photo slideshow guide

Wizard Slideshow Step 2: Add Effects to Photo Slideshow

Transition effects decide your photo slideshow style in my opinion. In the slideshow wizard, you could only select "no effect" or soft transition, but you could personalize your slideshow effects in the coming slideshow editing.

photo slideshow tutorial

Wizard Slideshow Step 3: Set Slideshow Background Music

Now load a music file for your photo slideshow. Click the Preview audio button to see if it's the right song or music slideshow. You could also adjust slideshow length to music. If so, photo duration will be auto adjusted after finishing slideshow.

photo slideshow music

Wizard Slideshow Step 4: Preview and End Photo Slideshow

There are two options here: Continue editing slideshow or add DVD menu to burn on DVD for watching on TV. On the right, you could preview the new created slideshow, if not satisfied, click the Back button to have changes.


preview photo slideshow

Manually edited slideshow: The slideshow created can be edited further however you want.

Add a DVD menu to the slideshow and burn it: MAGIX Xtreme PhotoStory on CD & DVD 8 deluxe now switches to the "Burn" screen. The slideshow can be fitted with a DVD menu and burned to DVD.

You can now select how you would like to continue and then end the wizard. After the photo slideshow is finished, burn slideshow to DVD to watch on TV or share slideshow online with friends and family.

how to share slideshow

Download Xtreme PhotoStory on CD & DVD deluxe for free trial
Purchase Xtreme PhotoStory on CD & DVD at $ 17.99 (instead of $29.97)


System requirements for Xtreme PhotoStory on CD & DVD

Computer:

For Microsoft® Windows® XP | Vista™

Minimal configuration:

* PC with Intel® Pentium® or AMD® Athlon® 1 MHz or higher, min. 512 MB RAM
* Min. 512 MB free drive space for program files; for video files min. 1 GB (5 GB recommended) 16-bit sound card, DVD drive, Microsoft®-compatible mouse
* SVGA graphics card with min. 32 MB RAM, Xtreme PhotoStory on CD & DVD 8: min. resolution 1024 x 600. All additional programs included: min. resolution 1024 x 768 at 16-bit high-color

Dec 9, 2009

How to Shoot Photos for Panorama Making

Panorama Picture - How to Take Photo for Panorama

How to Shoot Photos to Make Panorama

This article will tell you how to take photo and make panorama from taken photos using best photo panorama software.

Set Exposure Manually

When the camera automatically adjusts the exposure for each shot, seemingly subtle changes in light can make the corresponding areas of two overlapping photos look totally different. When this happens, the final panorama can have big bands of light and dark. Therefore, meter the scene in Aperture-priority or Shutter-priority mode, read your meter in the brightest section to avoid overexposure, and manually lock the Aperture and Shutter Speed for the entire set of shots.

Turn Auto Focus off

Turn off Auto Focus. Use the same focal length for all photos in the panorama sequence. If different focal lengths are used, photos to be stitched would bear inconsistencies that cannot be overcome during the stitching process.

Turn Auto White Balance Off

Turn the camera's auto white balance feature OFF. Manually set the most appropriate white balance and use that same setting for all of the shots in the panorama. Similar to Exposure option, when the auto white balance setting is on, slight changes in lighting conditions can cause the colors in one photo to differ greatly from the colors in the next.

Turn Off the Flash

Do not use a flash. Turn off the camera's auto-flash feature if it has one. Here is the reasons: A camera's flash has a limited range and a limited field of coverage and can create shadows that change shape and position from shot to shot. These inconsistencies make it difficult for the software to recognize corresponding parts of adjacent photos.

Do Not Change Size or Quality Setting

You are recommended to use the same photo size (resolution) and photo quality (i.e. fine) for all shots. Photos have the same size and quality could be easier to be stitch into photo panorama.

Use a Tripod Whenever Possible

When shooting photos for a panorama stitching, it's critical to keep the camera on the same plane throughout all of the shots. The easiest way to do this is to use a tripod. When shooting for 360 degrees panoramas, a level tripod ensures that the first and the last shots line up with each other. If your tripod does not have a built-in level, you can buy a spirit level at your local camera shop that fits in your camera's hot shoe.

Photo Overlap: Use 25% to 50% overlap

Shoot the photos using between 25% and 50% overlap. You do not need the same amount of overlap for each shot. Estimating the amount of overlap is fine. For wide angle lenses use more overlap for panorama photos (e.g. 50% overlap).

Shoot Sequential Photos

By creating photo groups, building a panorama in the software will be a little easier. The program has a unique feature that, with just one click, intelligently selects all of the photos that belong to the same panorama sequence. Because panorama photos are usually shot in quick order (less than 40 seconds apart), the program uses shot times (EXIF data) to create groups. By selecting one photo in a group, the entire group is selected.

Insert Divider Shots Manually

A simple way to divide one sequence of panorama photos from another is to insert (shoot) a black photo between them. Before beginning a new sequence, use the lens cap or a piece of cardboard to cover the camera?and take a shot. After you transfer the photos to your computer, it will be easy to see where one sequence ends and the next begins.

General Tips for Photo Taking

1. When shooting photos for horizontal panoramas, take an extra shot on each end (far left and far right), so you'll have more room from which to crop.
2. To create taller horizontal-style panoramic images, shoot the entire sequence with the camera turned 90- degrees (portrait).
3. Panorama Maker 5 turns your ordinary camera lens into a super-resolution, wide-angle lens. Simply capture 2 to 4 photos and stitch.
4. Turn your camera's Grid Display feature on. Showing grid lines in the viewfinder makes it easier for you to keep your camera level as you shoot a series of panorama shots - especially if you are not using a tripod. Grid Display is also useful for determining the correct amount of overlap.
5. 50% overlap usually works best for stitching. If you need help determining the proper amount of overlap, turn your camera's Grid Display feature on.
6. To avoid object duplication in the panorama, do not use more than 80% overlap. Turn your camera's Grid Display feature on, if you need help determining the proper amount of overlap.
7. Make people magically appear in the same panorama several times by shooting them in different areas of the shot and a different distance.
8. Check to see if your printer supports banner paper. If so, try printing your panoramic creations on long sheets of photo banner paper - great for framing.

Download the best photo panorama software to make awesome panorama after sequence photos are taken.
ArcSoft Panorama Maker 5 PRO

ArcSoft Panorama Maker 5 PRO
Create perfect panorama images with photos and videos using ArcSoft Panorama Maker 5 Pro. Media management and photo editing tools are offered to better organize your sources and apply final touches to your work.


Buy Panorama Maker for $79.99
_____________________________________________________________________
I have found a software Ebook tells you how to make beautiful wide angle
Panoramic Photographs in minutes by Denis Knight. It's The Absolute Step-by-Step Guide to the Perfect Panorama. More information about panorama ebook,Click Here!

Dec 8, 2009

Rip Lost Fifth Season DVD

Lost Fifth Season DVD - Rip DVD to Video

Lost: The Complete Fifth Season

The epic story of Lost twists, turns and time shifts in its brilliant fifth season. Packed with bonus material, including a revealing interview with the cast and an exclusive behind the scenes feature with Josh, Lost is better than ever.

When destiny calls, the Oceanic 6 frantically race back to the island. Discover what forced them to return and find out the fate of all those who were left behind. The answers to some of Lost's most pressing questions are revealed in this spectacular 5-disc collection, complete with deleted scenes, a behind the scenes celebration of the 100th episode and an incredible vault of exclusive bonus features. The show that revolutionized primetime proves once again why it is television's most addictive and creative series.
Bonus Features Include: 7 Lost on location, A Day with Josh Holloway, Los Angeles crew tribute with Michael Emerson, the 100th episode, Time Frame and Continuity, Bloopers, Deleted Scenes

Product Details

  • Actors: Matthew Fox, Evangeline Lilly, Naveen Andrews, Henry Ian Cusick, Terry O'Quinn
  • Format: Box set, Color, Dolby, DVD, NTSC
  • Language: English (Dolby Digital 5.1), Spanish (Dolby Digital 5.1), French Canadian (Dolby Digital 5.1)
  • Subtitles: French, Spanish
  • Region: Region 1 (U.S. and Canada only. Read more about DVD formats.)
  • Aspect Ratio: 1.78:1
  • Number of discs: 5
  • Studio: ABC Studios
  • DVD Release Date: December 8, 2009
  • Run Time: 731 minutes
Buy Lost: The Complete Fifth Season DVD Here

Download Software to Rip Lost Fifth Season DVD to Video and share online with friends!

    Dec 6, 2009

    Easily Stitch Your Favorite Photos Together

    easy photo panorama maker

    Arcsoft Panorama Maker 5 Pro is the best autostitch panorama software to turn photos and videos into awesome panoramic photos. The stitched photos could be then printed to hang on wall, or share online to catch eyeballs.
    Arcsoft Panorama Maker is also a powerful media management and photo editing tools to better organize your photo sequence and easily apply touches to your work.

    360 Degree Autostitch Photo Panorama

    Whatever you take travel photos or family photo, it's easy to sew these pictures together in minutes. No need to worry about which photo is the beginning, and which one is the final, just put them together and let autostitch panorama software do the 360 degree photo panorama for you.

    auto photo panorama maker

    Video Stitching to Panorama

    Now Panorama Maker 5 Pro even enables you to make photo panorama from videos! Similar to photo stitching, the program auto find the corresponding frames and stitched them to photo panorama.

    ArcSoft Panorama Maker 5 PRO

    ArcSoft Panorama Maker 5 PRO
    Create perfect panorama images with photos and videos using ArcSoft Panorama Maker 5 Pro. Media management and photo editing tools are offered to better organize your sources and apply final touches to your work.


    Buy Panorama Maker for $79.99

    There is software Ebook tells you how to make beautiful wide angle
    Panoramic Photographs in minutes by Denis Knight. It's The Absolute Step-by-Step Guide to the Perfect Panorama. More information about panorama ebook,Click Here!

    Photo Panorama Maker Requirements
    For Windows:

    * Windows XP/Vista, Windows 7
    * Pentium IV 2.4 GHz or equivalent AMD Athlon
    * 60 MB free hard drive space required for program installation
    * 512 MB DDR RAM or above
    * 16-bit color display at 800x600 with DirectX 3D support (Geforce 6800, ATI 9550 or above)
    * Microsoft DirectX 9.0 or higher
    * Apple QuickTime 7.0 or higher

    For Macintosh:

    * Macintosh OS 10.4, 10.5, 10.6
    * Power PC or Intel Mac
    * 100 MB free hard drive space required for program installation
    * 512 MB DDR RAM or above

    Dec 3, 2009

    How to Rip DVD Movie to Local Disk

    This tutorial will show to how to rip dvd to local disk, and watch with video player or share DVD movie online. OJOsoft DVD ripper is used to rip DVD to video on local disk.

    DVD Ripping Step 1: Open OJOsoft DVD Ripper

    When you open this easy to use DVD ripper software, you will see the following smart interface.

    DVD Ripper Software
    Download DVD Ripper for Free Trial

    DVD Ripping Step 2: Using OJOsoft to Rip DVD

    To rip DVD to video on local disk, just simple clicks are needed. Usually you will need: a - select disk as rip source after insert your DVD disc. b - specify the output folder and the output video format. c - click Convert button to start ripping DVD movie to DVD.

    DVD Ripping Step 3: Enjoy DVD Movie

    After waiting for a while, your videos on DVD will be saved to local disk so that you can watch it on computer again and again. You could also share ripped DVD movie on Youtube to share worldwide.

    Buy DVD and rip movies to protect your DVD disc, to save your money, and get more fun from DVD videos. OJOsoft DVD Ripper is the good choice to rip DVD to local disk. Free Download DVD Ripper Here.

    Nov 29, 2009

    Get More from Supernatural: The Complete Fourth Season

    Supernatural: The Complete Fourth Season

    After enduring unspeakable torture, Dean escapes from Hell, rescued by an all-powerful creature he's never seen before – an Angel – a warrior of God who recruits Sam and Dean into Heaven's battle against Hell. And there are whispers that a certain fallen angel will soon be freed from his prison deep in Hell: Lucifer. If Sam and Dean can't stop it – if Lucifer walks free – he’ll bring on the Apocalypse. Meanwhile, the Winchester Brothers reunite and hit the road, battling the supernatural wherever they go. They encounter demons, spirits, Dracula himself and even a drunk, heavily armed 7-foot-tall teddy bear. All the while, the ultimate war draws them into its horror throughout this enthralling 6-Disc, 22-Episode Season Four. Caught between Heaven and Hell, between God and the Devil, the Winchester brothers must battle for the future of humankind.

    More Product Details

    Buy Supernatural DVD Here

    Download Software to Backup Supernatural or Rip Supernatural DVD to Video


    Copyright © 2009 Windows Music Photo DVD Tools Blog. All rights reserved.